Send telemetry to AWS IoT Core
In this example we create an application where we send telemetry data from our camera to AWS IoT Core. Telemetry data from the camera could be motion detection events or custom events from ACAP applications installed on the camera.
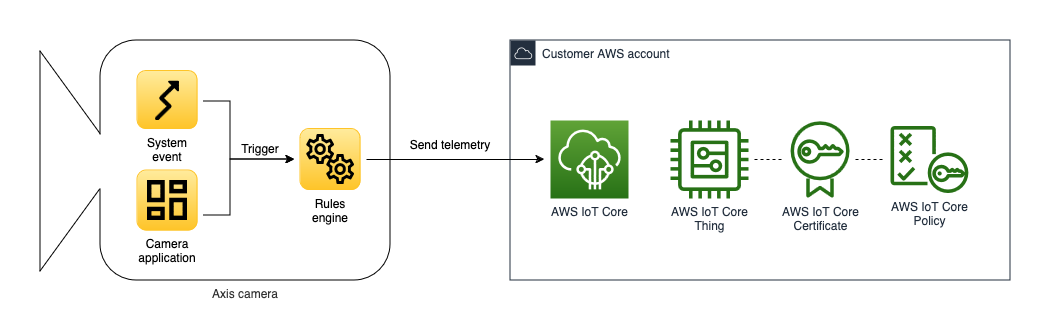
The application consists of the following AWS resources.
- AWS IoT Core Thing
- AWS IoT Core Certificate
- AWS IoT Core Policy
An Axis camera has an internal MQTT client that will connect to AWS IoT Core. The camera authenticates to AWS IoT Core using an X.509 certificate.
Prerequisites
- A network camera from Axis Communications (example has been verified to work on a camera with firmware >=10.4)
- AWS CLI (install and configure)
- Git (install)
- curl (install)
To follow the procedures in this hot-to guide you need a command-line interface or shell to run commands, see the command-line interface reference for more information.
Instructions
The instructions are divided into two parts. The first part covers deploying the AWS resources and the second part covers configuring the camera.
To start off, make sure to clone the repository and navigate into the example directory:
git clone https://github.com/AxisCommunications/acap-integration-examples-aws.git
cd acap-integration-examples-aws/telemetry-to-aws-iot-core
Deploy AWS resources
Let's deploy the AWS resources required to receive telemetry from a camera. The bash script create-cloud-resources.sh should be called with the following positional arguments.
- Stack name: The name of the AWS CloudFormation stack, e.g.
axis-device-telemetry - Thing name: The name of the AWS IoT Core Thing, e.g.
device01
The following output indicates that all resources have been created successfully:
$ ./create-cloud-resources.sh axis-device-telemetry device01
> Downloading Amazon root CA certificate...
>     ./cert/AmazonRootCA1.pem
> Create principal certificate...
>     ./cert/device01.crt
>     ./cert/device01.key
> Deploy AWS CloudFormation template...
>
> Waiting for changeset to be created..
> Waiting for stack create/update to complete
> Successfully created/updated stack - axis-device-telemetry
>
> Done!
>
> The following settings will be used when configuring the camera.
>
> MQTT Client Configuration
> Host:       abcdefghijklmn-ats.iot.us-west-1.amazonaws.com
> Client id:  device01
We will use the MQTT host and client ID in the upcoming chapter where we configure the camera.
Configure the camera
Now that the resources in AWS are ready to accept telemetry, let's continue with configuring the camera to send events.
We will begin by uploading our AWS IoT Thing certificate to the camera. Start by navigating to the camera using your preferred web browser. To add a client certificate, follow the steps below.
- In the user interface of the camera, select System -> Security
- Above the list of Certificates, click on Add certificate to add a new certificate
- Select Upload a client-server certificate using a separate private key and click on Next
- For the certificate, browse to the
cert/directory and select<thing name>.crt, e.g.device01.crt. For the key file, browse to the same directory and select<thing name>.key, e.g.device01.key. Click on Next. - Click on Install
- Click on Close
Next we have the AWS CA certificate. To add it to the camera, follow the steps below.
- While still in Security, above the list of Certificates, click on Add certificate to add a new certificate
- Select Upload a CA certificate and click on Next
- For the CA certificate, browse to the
cert/directory and selectAmazonRootCA1.pem - Click on Install
- Click on Close
The next step is to configure the MQTT client on the camera.
- In the user interface of the camera, select System -> MQTT
- In the MQTT client section use the following settings
- Host:
<aws iot core host>, i.e. the host echoed in the final step of the previous chapter - Protocol:
MQTT over SSL - Port:
8883 - Client certificate:
<thing name>, e.g.device01 - CA certificate:
AmazonRootCA1 - Validate server certificate:
checked - Client ID:
<thing name>, e.g.device01
- Host:
- Click Save
Once the settings are saved, click on Connect on the top of the MQTT settings page.
Let's continue with configuring the events the camera should send AWS IoT Core. For the sake of simplicity we create a new schedule that triggers an event every 5 seconds, because the event is predictable and doesn't require any physical access to the camera. You can change this event to any type sent by the camera or an installed ACAP application.
- In the user interface of the camera, select System -> Events -> Schedules
- Add a new schedule with the following settings
- Name:
Every 5 seconds - Type:
Pulse - Repeat every:
5 Seconds
- Name:
- Click Save
Finally select pulses to be the event type the camera sends to AWS IoT Core.
- Return to System -> MQTT
- Scroll down to the MQTT publication section and enter following settings
- Use default topic prefix:
unchecked - Topic prefix:
<thing name>, e.g.device01 - Include condition:
checked - Include namespaces:
unchecked - Include serial number:
checked
- Use default topic prefix:
- Click on Save
- Click Add condition and enter the following settings
- Condition:
Pulse
- Condition:
- Click on Add
At this point the camera is sending a new event every 5 seconds to AWS IoT Core. Proceed with viewing the events in AWS IoT Core in the AWS Console.
- Navigate to the AWS IoT Core service in the AWS Console.
- On the left side, expand Test and select the MQTT test client
- In the Subscribe to a topic tab, enter the topic wildcard character
#anc click the Subscribe button
Cleanup
To delete the deployed AWS resources, delete the AWS CloudFormation stack either via the AWS Console or via the AWS CLI using the following command:
aws cloudformation delete-stack --stack-name <stack name>
Troubleshooting
This section will highlight some of the common problems one might encounter when running this example application.
MQTT client cannot connect to AWS IoT Core
If the MQTT client is unable to successfully connect to AWS IoT Core, please make sure that the following statements are true.
- The camera is not behind a proxy. This example does not support a network topology where requests needs to traverse a proxy to reach the internet.
- The camera date and time is correctly configured. The date and time of the camera needs to be correctly configured.
Disclaimer
Amazon Web Services, AWS and the Powered by AWS logo and AWS IoT Core are trademarks of Amazon.com, Inc. or its affiliates. All other trademarks are the property of their respective owners, and we are not affiliated with, endorsed or sponsored by them or their affiliates.
As described in this document, you may be able to connect to, access and use third party products, web sites, example code, software or services (“Third Party Services”). You acknowledge that any such connection and access to such Third Party Services are made available to you for convenience only. Axis does not endorse any Third Party Services, nor does Axis make any representations or provide any warranties whatsoever with respect to any Third Party Services, and Axis specifically disclaims any liability or obligations with regard to Third Party Services. The Third Party Services are provided to you in accordance with their respective terms and conditions, and you alone are responsible for ensuring that you (a) procure appropriate rights to access and use any such Third Party Services and (b) comply with the terms and conditions applicable to its use.